
[Auto CQUPT Plan] 免费洗衣机
1302 字
7 分钟
[Auto CQUPT Plan] 免费洗衣机

记重庆邮电大学物联网洗衣机破解方法
Warning
本博文仅供技术参考,请勿用于非法用途!!!
1. 破解原理
重邮的物联网洗衣机本质上就是应该普通洗衣机,只是多了一个可以和控制板卡用串口通信的物联网模块而已。
所以,我们只需要获取启动洗衣机时物联网模块发送的数据,并再找一个同样可以进行串口通信的模块替换物联网模块就行。
flowchart LR
subgraph 洗衣机本体["🧺 洗衣机本体"]
direction TB
ControlBoard["控制板卡<br/>(主控MCU)"]
Motor["电机/水泵/加热器等<br/>(执行机构)"]
Sensors["水位/温度/转速传感器<br/>(数据采集)"]
end
subgraph 物联网部分["📡 物联网模块"]
direction TB
IoTModule["物联网通信模块<br/>(WiFi/4G)"]
Cloud["云端服务器<br/>(重邮洗衣平台)"]
MobileApp["手机APP<br/>(用户端)"]
end
subgraph 替换方案["🔧 替换方案"]
CustomModule["自定义串口模块<br/>(ESP32/Arduino等)"]
end
%% 原有连接关系
ControlBoard <-->|"UART/RS232/RS485<br/>串口通信<br/>启动指令/状态上报"| IoTModule
IoTModule <-->|"HTTP/MQTT<br/>网络通信"| Cloud
Cloud <-->|"API接口"| MobileApp
%% 洗衣机内部连接
ControlBoard -->|"GPIO/PWM<br/>控制信号"| Motor
Sensors -->|"ADC/Digital<br/>传感器数据"| ControlBoard
%% 替换方案连接
ControlBoard -.->|"相同串口协议<br/>模拟原模块"| CustomModule
%% 样式定义
style ControlBoard fill:#e1f5fe,stroke:#01579b,stroke-width:2px
style IoTModule fill:#fff3e0,stroke:#e65100,stroke-width:2px
style CustomModule fill:#e8f5e9,stroke:#2e7d32,stroke-width:2px,stroke-dasharray: 5 5
style Cloud fill:#f3e5f5,stroke:#6a1b9a,stroke-width:2px
style MobileApp fill:#fce4ec,stroke:#c2185b,stroke-width:2px
style 洗衣机本体 fill:#fafafa,stroke:#424242,stroke-width:1px
style 物联网部分 fill:#fafafa,stroke:#424242,stroke-width:1px
style 替换方案 fill:#fafafa,stroke:#424242,stroke-width:1px,stroke-dasharray: 5 5
2. 怎么获取物联网模块发送的指令
必需品:CH340 USB-TTL 串口模块
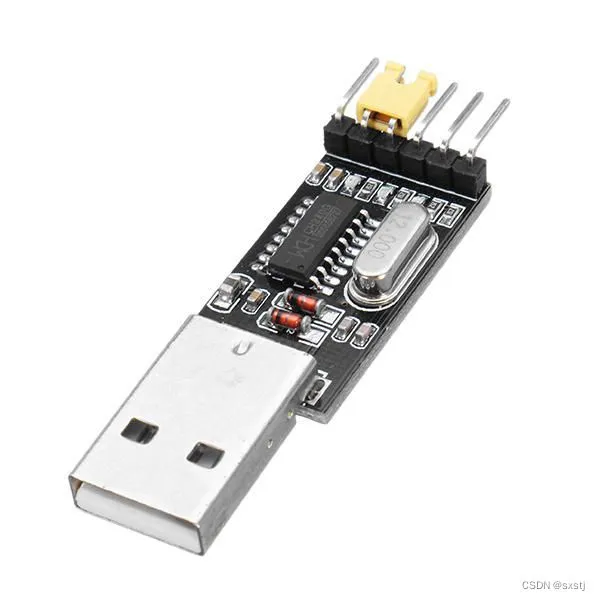
原理: 每次扫描二维码付钱时,物联网模块就会向控制板卡的UATR发送指令,只要将物联网模块接入CH340 USB-TTL 串口模块,然后再给每一种洗衣服务都付一次钱就可以得到所有的指令。
但是这里我从大手子那里搞到了宿舍内洗衣机(不是公共洗衣机)所有的UATR指令:
波特率:2400
| Hex | 备注 |
|---|---|
| AA 06 01 98 04 00 75 03 | 1元脱水 |
| AA 06 01 98 03 01 D0 AC | 3元快速洗 |
| AA 06 01 98 02 02 B2 0D | 4元标准洗 |
| AA 06 01 98 02 02 B2 0A | 4元标准洗(有6元加强洗的版本) |
| AA 06 01 98 01 03 51 C6 | 6元加强洗(第一部分) |
| AA 06 00 9F 01 03 09 | 6元加强洗(第二部分) |
注意:6元加强洗的两部分连续发送
3. 物联网模块替代板卡的选择以及接线
3.1 开发板选择
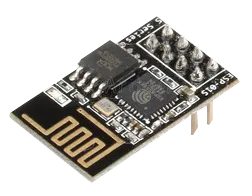
这里我决定选用 ESP8266 开发板作为物联网模块的替代方案。该芯片集成硬件 UART 接口,并支持通过软件模拟额外串口;内置 Wi-Fi 无线通信能力,扩展性较强。此外,ESP8266 具备成本优势,且兼容 Arduino 开发框架,学习曲线平缓,适合快速原型开发。
3.2 接线
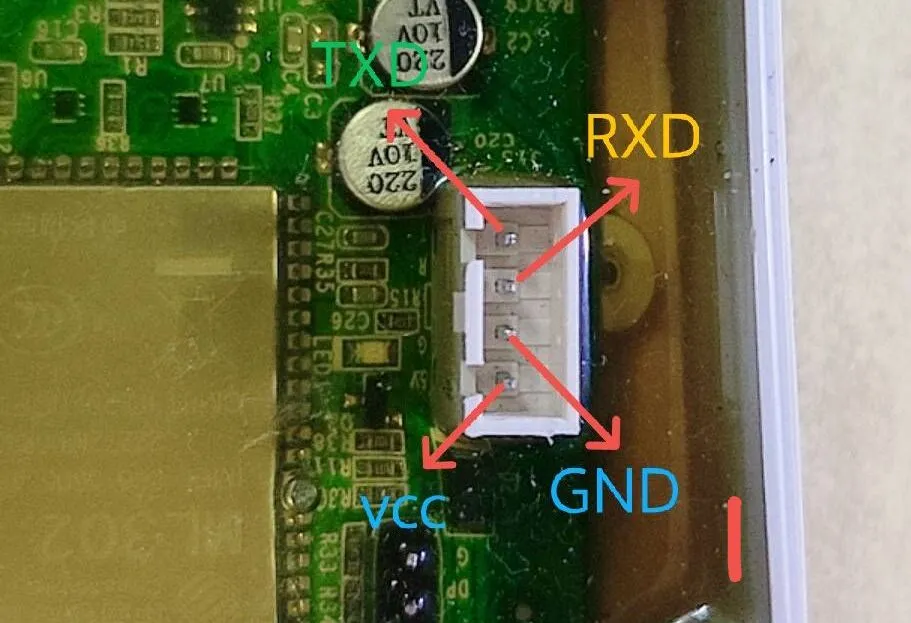
以下是 Node MCU 与 洗衣机控制板卡 的线路连接
| NodeMCU | 洗衣机控制板卡 |
|---|---|
| VCC | 5V |
| GND | GND |
| TXD | RXD |
| RXD | TXD |
以下是读取指令时 CH340 USB-TTL 与 洗衣机控制板卡 的线路连接(5V不接)
| CH340 USB-TTL | 洗衣机控制板卡 |
|---|---|
| GND | GND |
| TXD | RXD |
| RXD | TXD |
洗衣机控制板卡 引脚定义 :
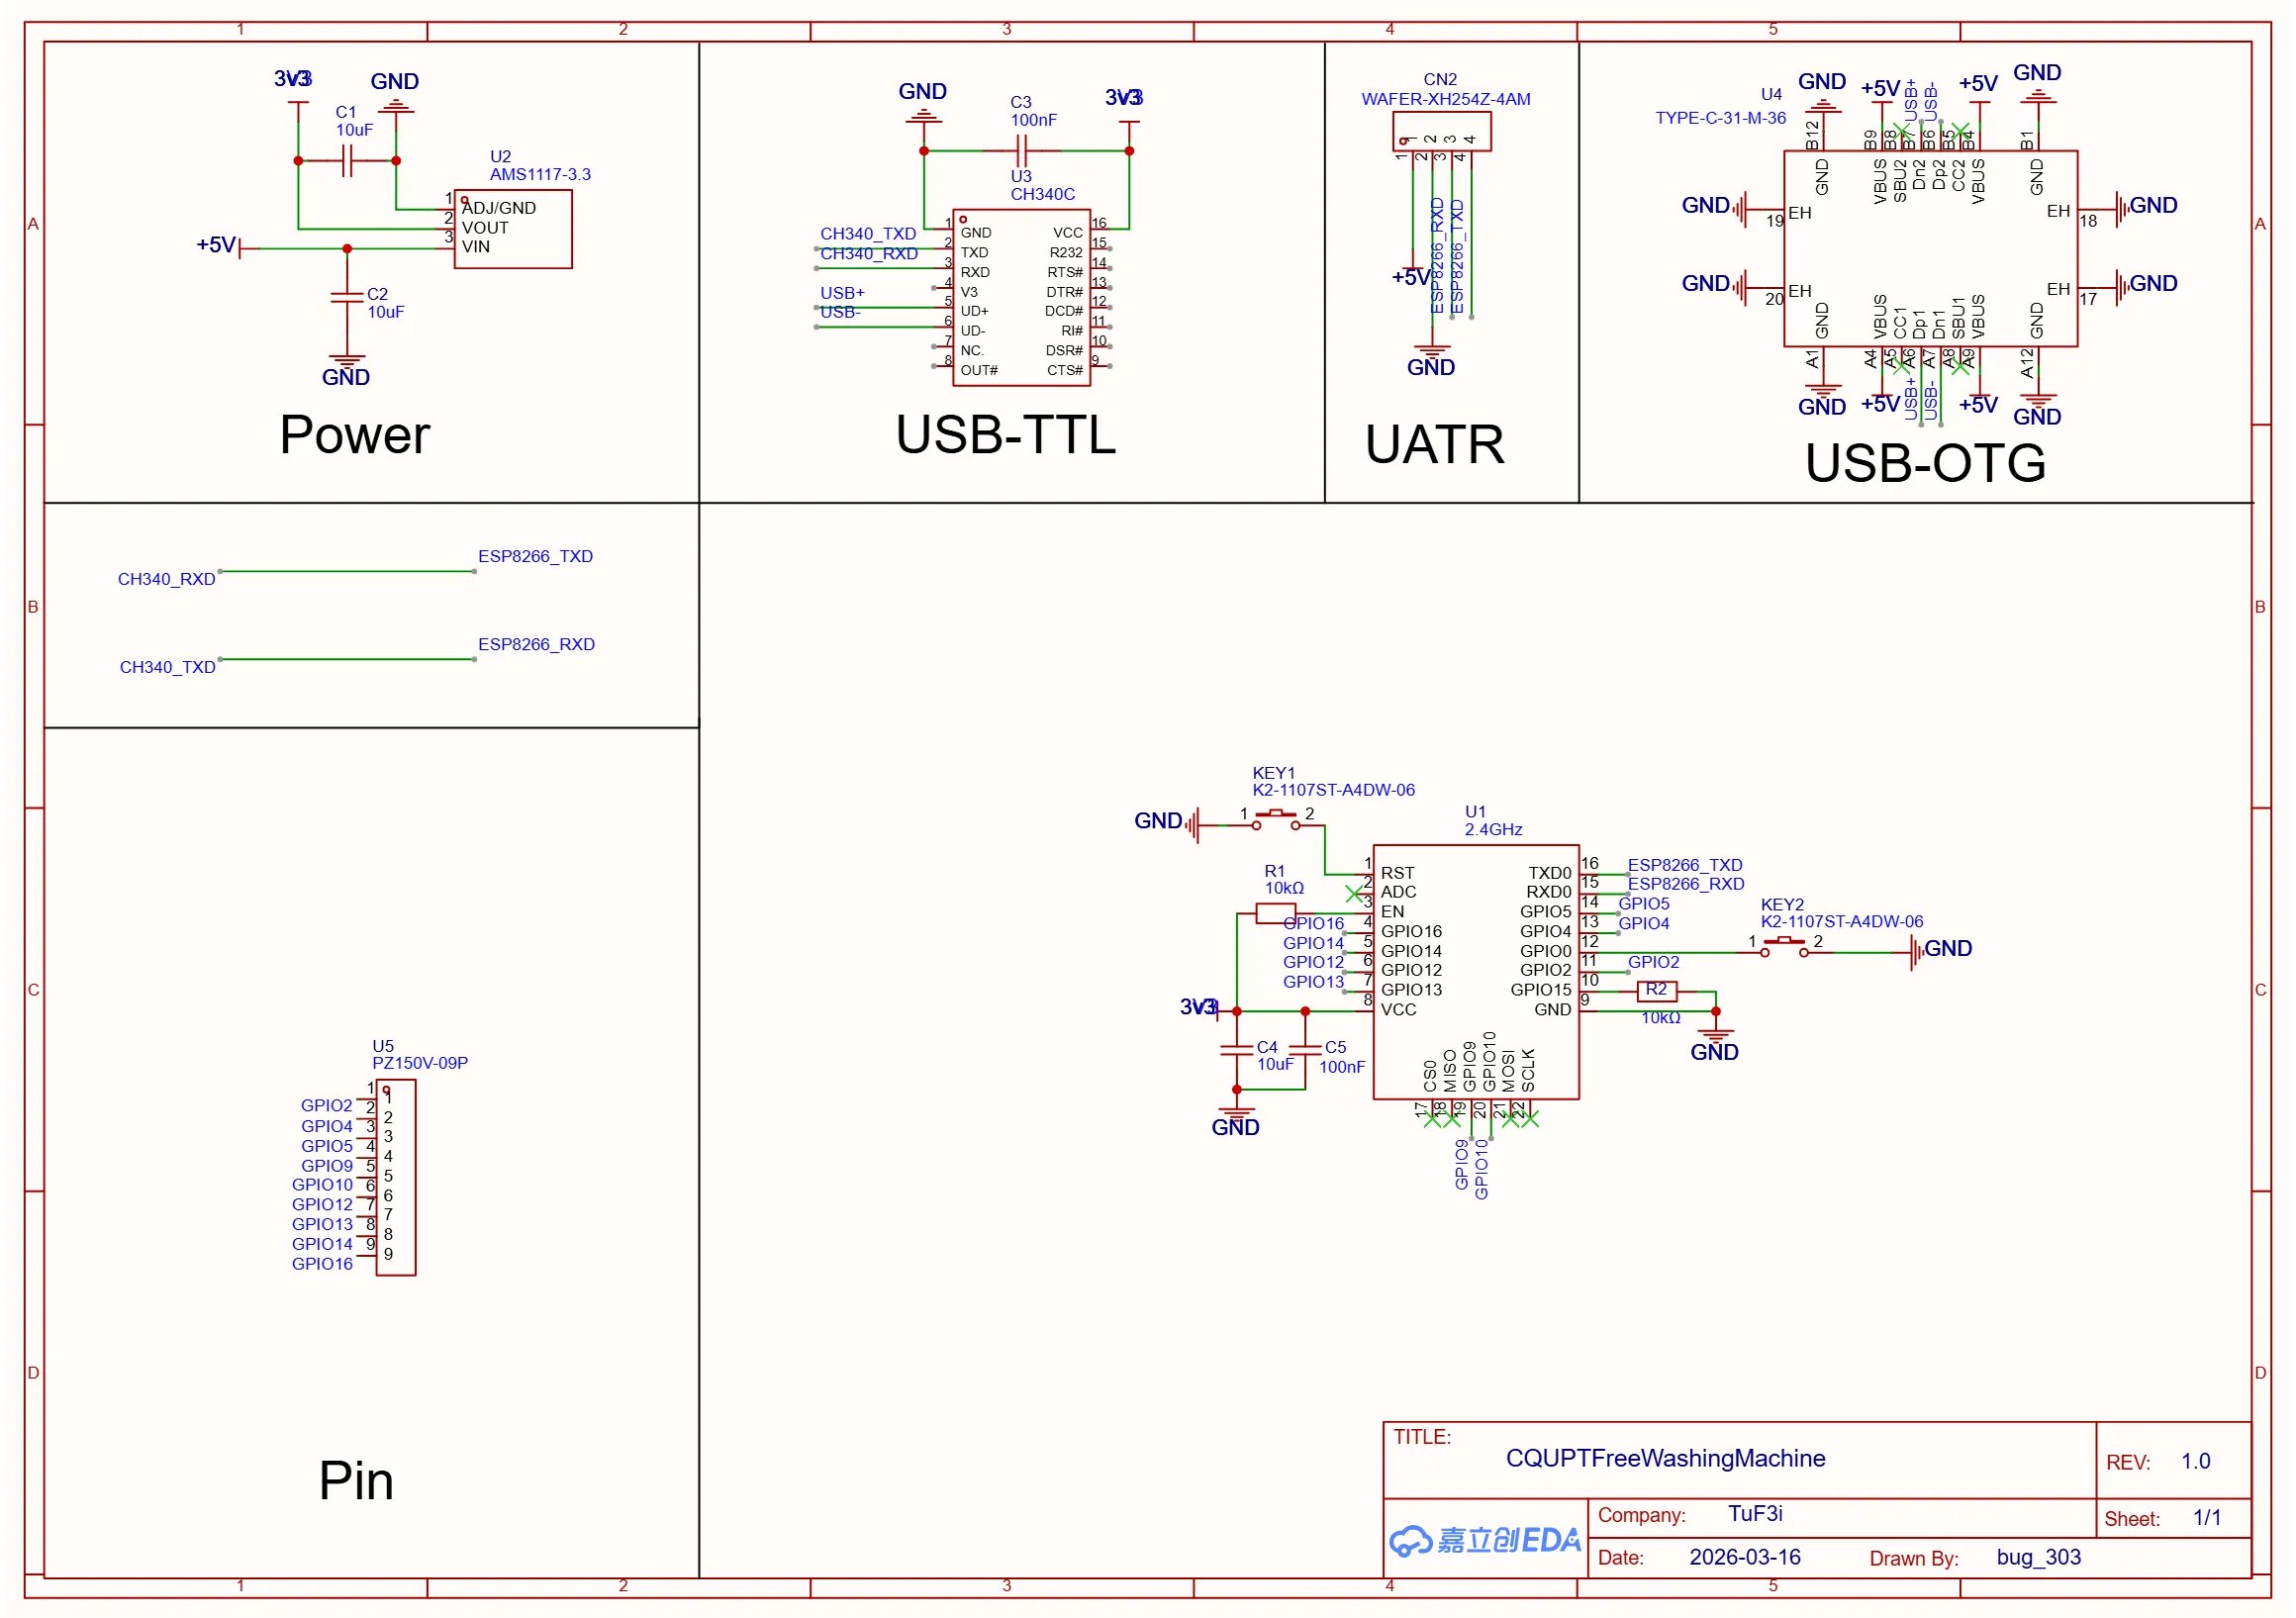
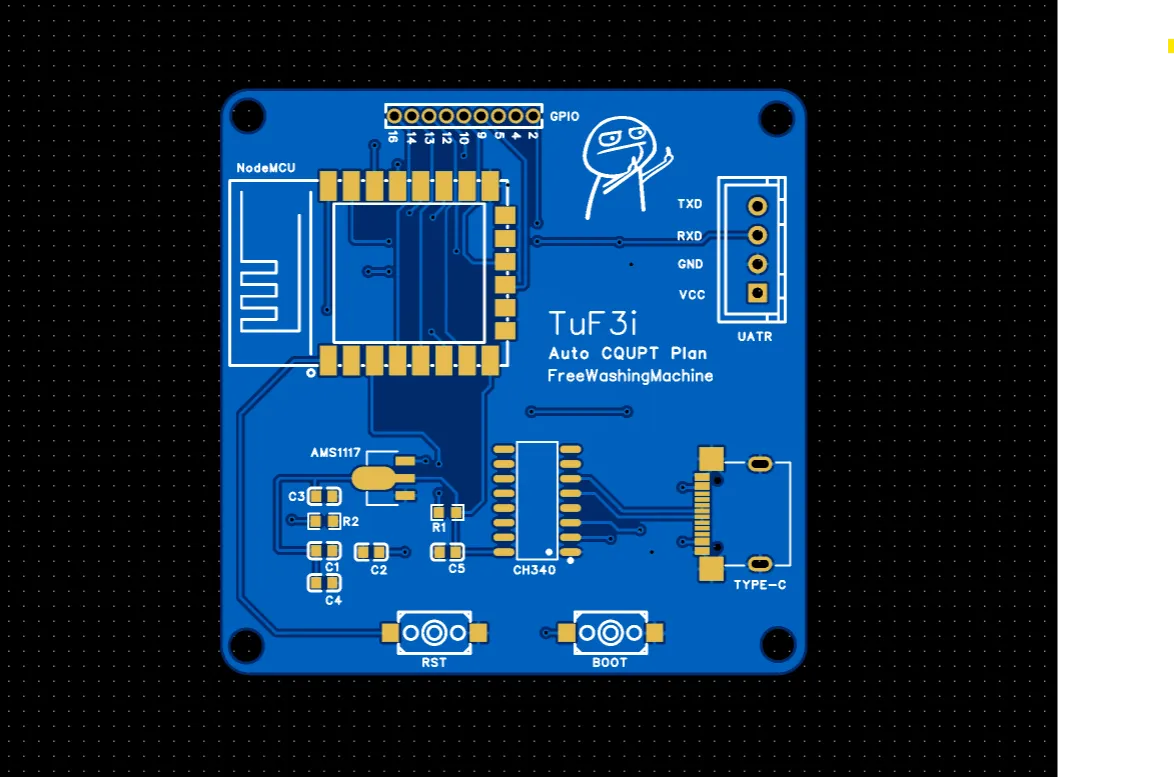
4. 自己画的板子
这几天挺闲的,就用嘉立创EDA画了一块板子,直接接上就能用
4.1 原理图样例
4.2 PCB样例
5. 程序
采用 PlaformIO 编写,适用于 NodeMCU 0.9 及 NodeMCU 1.0
5.1 串口部分
const uint8_t CMD_1YUAN[] = {0xAA, 0x06, 0x01, 0x98, 0x04, 0x00, 0x75, 0x03};const uint8_t CMD_3YUAN[] = {0xAA, 0x06, 0x01, 0x98, 0x03, 0x01, 0xD0, 0xAC};const uint8_t CMD_4YUAN[] = {0xAA, 0x06, 0x01, 0x98, 0x02, 0x02, 0xB2, 0x0D};const uint8_t CMD_4YUAN_PLUS[] = {0xAA, 0x06, 0x01, 0x98, 0x02, 0x02, 0xB2, 0x0A};const uint8_t CMD_6YUAN_1[] = {0xAA, 0x06, 0x01, 0x98, 0x01, 0x03, 0x51, 0xC6};const uint8_t CMD_6YUAN_2[] = {0xAA, 0x06, 0x00, 0x9F, 0x01, 0x03, 0x09};
void sendCmd(const uint8_t* data, size_t len) { Serial.write(data, len); Serial.flush();}5.2 DashBoard部分
ESP8266WebServer server(80);
void handleRoot() { server.send(200, "text/html", R"rawliteral(<!DOCTYPE html><html><head><meta charset="UTF-8"><meta name="viewport" content="width=device-width, initial-scale=1.0"><title>洗衣机控制</title><style>*{margin:0;padding:0;box-sizing:border-box}body{font-family:-apple-system,BlinkMacSystemFont,sans-serif;background:linear-gradient(135deg,#667eea 0%,#764ba2 100%);min-height:100vh;padding:20px}.container{max-width:400px;margin:0 auto;background:rgba(255,255,255,0.95);border-radius:20px;padding:30px;box-shadow:0 20px 60px rgba(0,0,0,0.3)}h1{text-align:center;color:#333;margin-bottom:30px;font-size:24px}.btn-grid{display:grid;gap:15px;margin-bottom:30px}button{padding:18px;border:none;border-radius:12px;font-size:16px;font-weight:600;cursor:pointer;transition:all 0.3s;color:white;text-shadow:0 1px 2px rgba(0,0,0,0.2)}button:active{transform:scale(0.95)}.btn-1{background:linear-gradient(135deg,#f093fb 0%,#f5576c 100%)}.btn-3{background:linear-gradient(135deg,#4facfe 0%,#00f2fe 100%)}.btn-4{background:linear-gradient(135deg,#43e97b 0%,#38f9d7 100%)}.btn-4p{background:linear-gradient(135deg,#fa709a 0%,#fee140 100%)}.btn-6{background:linear-gradient(135deg,#30cfd0 0%,#330867 100%)}.custom-section{border-top:2px dashed #ddd;padding-top:25px}.custom-section h3{color:#666;margin-bottom:15px;font-size:14px;text-transform:uppercase;letter-spacing:1px}textarea{width:100%;padding:12px;border:2px solid #e0e0e0;border-radius:8px;font-family:monospace;font-size:14px;resize:vertical;min-height:60px;margin-bottom:10px}textarea:focus{outline:none;border-color:#667eea}.btn-send{width:100%;background:#333;color:white}.status{text-align:center;margin-top:15px;padding:10px;border-radius:8px;font-size:14px;opacity:0;transition:opacity 0.3s}.status.show{opacity:1}.status.success{background:#d4edda;color:#155724}.status.error{background:#f8d7da;color:#721c24}</style></head><body><div class="container"><h1>🧺 洗衣机控制面板</h1><div class="btn-grid"><button class="btn-1" onclick="send('1')">1元脱水</button><button class="btn-3" onclick="send('3')">3元快速洗</button><button class="btn-4" onclick="send('4')">4元标准洗</button><button class="btn-4p" onclick="send('4p')">4元标准洗(加强版)</button><button class="btn-6" onclick="send('6')">6元加强洗</button></div><div class="custom-section"><h3>自定义指令 (十六进制)</h3><textarea id="custom" placeholder="AA 06 01 98..."></textarea><button class="btn-send" onclick="sendCustom()">发送自定义指令</button></div><div id="status" class="status"></div></div><script>function show(msg,err){const e=document.getElementById('status');e.textContent=msg;e.className='status show '+(err?'error':'success');setTimeout(()=>e.className='status',2000)}async function send(t){try{await fetch('/'+t,{method:'POST'});show('已发送')}catch(e){show('失败',1)}}async function sendCustom(){const d=document.getElementById('custom').value.trim();if(!d)return;try{await fetch('/custom',{method:'POST',headers:{'Content-Type':'application/x-www-form-urlencoded'},body:'d='+encodeURIComponent(d)});show('已发送')}catch(e){show('失败',1)}}</script></body></html>)rawliteral");}5.3 配置部分
#include <Arduino.h>#include <ESP8266WiFi.h>#include <ESP8266WebServer.h>#include <LittleFS.h>
#define BAUD_RATE 2400
const char* SSID = "WashingMachine";const char* PASSWORD = "12345678";IPAddress localIP(172, 16, 0, 1);IPAddress gateway(172, 16, 0, 1);IPAddress subnet(255, 255, 255, 0);5.4 Setup 和 Loop
void setup() { Serial.begin(BAUD_RATE); delay(1000);
LittleFS.begin();
WiFi.softAPConfig(localIP, gateway, subnet); WiFi.softAP(SSID, PASSWORD);
server.on("/", handleRoot); server.on("/1", HTTP_POST, [](){ sendCmd(CMD_1YUAN, sizeof(CMD_1YUAN)); server.send(200); }); server.on("/3", HTTP_POST, [](){ sendCmd(CMD_3YUAN, sizeof(CMD_3YUAN)); server.send(200); }); server.on("/4", HTTP_POST, [](){ sendCmd(CMD_4YUAN, sizeof(CMD_4YUAN)); server.send(200); }); server.on("/4p", HTTP_POST, [](){ sendCmd(CMD_4YUAN_PLUS, sizeof(CMD_4YUAN_PLUS)); server.send(200); }); server.on("/6", HTTP_POST, [](){ sendCmd(CMD_6YUAN_1, sizeof(CMD_6YUAN_1)); delay(100); sendCmd(CMD_6YUAN_2, sizeof(CMD_6YUAN_2)); server.send(200); }); server.on("/custom", HTTP_POST, [](){ String hex = server.arg("d"); hex.replace(" ", ""); for(size_t i=0; i<hex.length(); i+=2) { if(i+1 < hex.length()) { String b = hex.substring(i, i+2); Serial.write((uint8_t)strtol(b.c_str(), NULL, 16)); } } Serial.flush(); server.send(200); });
server.begin();}
void loop() { server.handleClient();}6. 结尾
没有了喵,谢谢欣赏

文章分享
如果这篇文章对你有帮助,欢迎分享给更多人!
[Auto CQUPT Plan] 免费洗衣机
https://blog.tuf3i.click/posts/acp-washing-machine/ 相关文章 智能推荐
1
Linux Shell Pipeline
运维::Linux Linux Shell Pipeline的一些知识点
2
Linux Systemd的一些东西
运维::Linux Linux Systemd的一些知识点
3
Dank Material Shell安装
折腾::Linux 在Debian上安装DMS的折腾记录
4
博客-启航
博客::启航 我的第一篇博客
随机文章 随机推荐

